How to Chose Drawers?
Planning kitchen storage, where are you going to put cutlery and other everyday small things, like a knife sharpener and napkin holder? And how about a mixer, blender and other small appliances? Heavy pans? All this stuff is best kept in the kitchen drawers. The main advantage of a drawer over a cabinet is that you don’t have to bend yourself in half to reach these things.
A drawer is a functional unit whose basic design consists of five parts: a front face, two sides, a back, and a bottom, which are joined together using Dovetail joints to create a box without a top. The base kitchen cabinet can have 2 or more drawers, which can be opened to reveal the entire contents. Drawers become so common that it is difficult to picture a kitchen without ones. Moreover, some homeowners intentionally replace all their bottom cabinets with drawers.
Because it's a little more complicated than a cabinet with a door, you should pay attention to its design and load capacity. Drawers come in different sizes and are made of different materials. Modern drawers might have soft-close and self-close mechanisms and other features to increase user experience. For this reason, they tend to be slightly more expensive than cabinets. To get the most out of your kitchen, you need to know what kind of drawers you are planning to install and what makes them best for your settings.
Drawers types
There are many types of drawers, but the most common ones are melamine drawers, solid wood drawers, and metal-side drawers. All the drawers have the same function, the difference is only in the look and durability of it. A cabinet with drawers can be used as a bedside shelf or nightstand in a bedroom. This type of drawer is mounted on a wall and is referred to as a wall-mounted drawer. This cabinet has no base, it is screwed to the wall and looks floating. It can be used as a makeup table, desktop, or dressing table.
As it was mentioned before, a drawer can be used as a floating wall-mounted cabinet as well it can be used as a part of a base kitchen cabinet. What is the drawer base cabinet? It is a bottom cabinet box that has one or more sets of drawers. The standard base drawer cabinet is 24 inches deep, but sizes can vary in a custom world. The kitchen drawer set consists of 2 to 4 units. 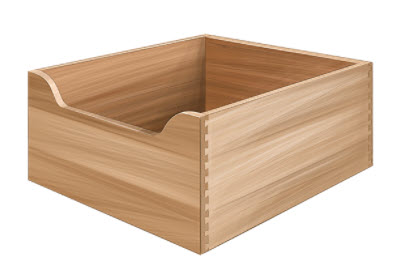
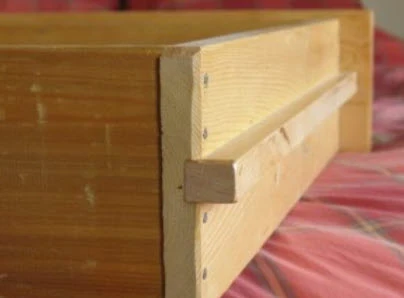
The typical material used for drawer bottoms is half an inch of plywood or melamine. The drawer has two sides, one back, and one front piece. A typical thickness of the material is ⅝ inches. The front of the drawer is used for attaching a drawer front which is finished material. Usually, the drawer front has a horizontal look.
Drawer fronts could have tons of options. There are so many colours and textures available on the market. One of the most important and the most difficult tasks is to choose decorative hardware, which is a drawer handle. Handles can be installed on a different part of the drawer front. It can be centred or can be offset. Edge pulls or inset pulls are other options available.
Drawer specifications
Selecting the material is the first thing you need to decide on how to build drawer boxes. Nowadays, there are many options available on the market such as melamine, wood, or metal. If you decide to use melamine material which is the most affordable option, start with the colour. The most popular options for the colour are white, gray, black or maple. If you are adding a drawer to your existing cabinet make sure that the colour of your existing cabinet and a new drawer go together well as you do not want it to look like it does not belong there. In addition to regular stock melamines, textured melamine options are available. That option is more expensive than the plain melamine option. After you made your decision on colour, decide what is thickness of the material you want to use. ⅝ inches is the typical material thickness used for the construction of drawer boxes. ¾ inches thick material would be an upgrade. The melamine drawer consists of 5 parts, 4 parts go to the perimeter of the box and 1 part goes to the bottom. Cut2size is using ⅝ materials for all 5 parts.
Taking the right measurements is very important. Measure the inside of the box, then based on the glide type you would like to use, you need to subtract ½ inches from the interior box width for under-mount glides, or 1 inch for the side mount ball-bearing drawer slides. Next, you need to check what height is available for the drawer boxes inside the cabinet. Based on this information, you can select the heights of the future drawers. There are several standard drawer heights that you can choose from: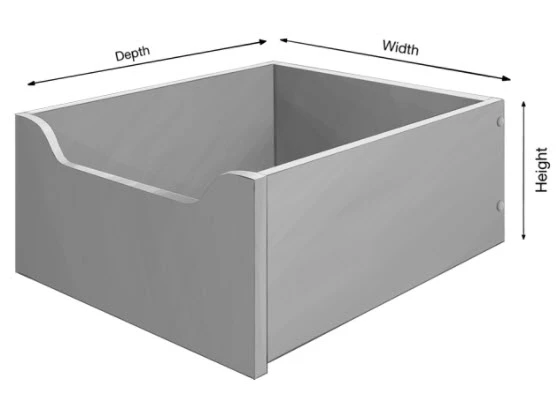
- 2 ¼” or 57 mm
- 3 ¼” or 83 mm
- 4 ¼” or 108 mm
- 5 ¼” or 133 mm
- 6 ¼” or 159 mm
- 7 ¼” or 184 mm
- 8 ¼” or 210 mm
- 9 ¼’ or 235 mm
- 10 ¼” or 260 mm
- 11 ¼” or 286 mm
- 12 ¼” or 311 mm
- 13 ¼” or 337 mm
- 14 ¼” or 362 mm
After the height of the drawer has been figured out, it is time to make a cut list of all the parts with the final size. Drawer box depth is calculated based on the type of glide. For example, for any under-mount glides, your calculation will be specified drawer glide depth minus ⅜” or 10 mm for your drawer box depth. For the side mount glides, you do not need to subtract anything, so you can make your drawer box the same size as the glide depth. Next, for under-mount glides, you need to make sure your drawer bottom is installed ½” higher from the bottom of the drawer to create the room to hide the glide hardware. Make sure you install the glide clip bracket, to make sure your drawer is locked after the installation.
Drawer bottom
As one of the key components of a drawer, drawer durability should not be overlooked as an integral component that plays an integral role in maintaining the long-term functionality of any storage drawer.
The drawer bottom serves as the foundation, providing support for items stored within. Its thickness directly impacts how well a drawer can withstand the weight of its contents without sagging or warping over time. A sturdy drawer bottom ensures structural integrity is upheld, thus avoiding potential damage or malfunction to prevent further issues in its performance. A solid drawer bottom should withstand frequent opening and closing actions as well as the weight of items placed. A warped or sagging drawer bottom may decrease this functionality or make opening it difficult.
Selecting high-quality materials such as half-inch plywood or melamine for drawer construction ensures its long-term resilience, meeting daily use demands while still maintaining form and function over time.
Drawer slides
Are all the drawers in your kitchen working properly? Are they all closing and opening how they are supposed to? If the answer is no, it is most likely the time to get some new drawer slides! Installing new drawer slides in your kitchen can be very helpful as drawer slides are among the most important kitchen accessories. It is important to invest money in good hardware if you don't want to struggle every time you are using your cabinets. We wouldn't want you to suffer unnecessarily; so we've come up with some tips to help you out.
How to choose drawer slides?
Whether you're installing new drawer slides in your bedroom closet or replacing worn slider hardware on existing kitchen cabinets, learning how to choose drawer slides for your project is essential for the long-term use and life of your cabinets. The selection of slides will depend on several factors:
- size and design of your drawers;
- the amount of money you have to spend on your remodel;
- the available hardware;
The following guide provides helpful tips to help you choose slides that are both functional and durable.
Drawer slides types
Drawer slides are also known as drawer glides or runners. This hardware allows drawer users to slide it in and out, allowing easy access to the various items contained inside. 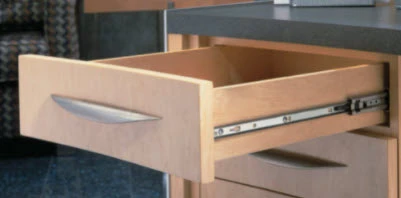 Depending on the type of drawer slides, they are made of the following materials:
- wooden slides;
- plastic slides;
- metal slides;
In addition to the different types of drawer slides, different types of hardware might be used to install different types of drawer slides. As a result, it is necessary to be informed about the types of hardware before buying it. Let’s have a look at the different types of drawer slides:
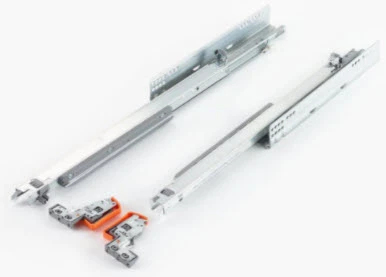
- The first type of drawer slides is the ball-bearing drawer slides. These are typically used on heavy-duty drawers. When installed, the ball bearings will roll on greased tracks that provide a smooth glide. These types of drawer slides are usually sold in pairs - one left one right. Drawer glides require lubrication to ensure that the bearings do not get stuck during operation and ensure the long life span of the hardware.
- Another type of drawer slide that is used for making the usage of the drawer more efficient is the under-mount full extension drawer slide. These glides have a longer rail attached to the drawer slide that makes a longer glide extension. This feature helps people to use the inside drawer space more efficiently, especially if the drawer contains heavy items inside.
- Lastly, there are also two-piece wooden drawer slides, that have a long history and are still being used nowadays in some old look furniture. To use that glide, a cabinet maker has to make a groove on the side of the drawer approximately ⅝ inches high by ¼ inches deep The drawer must be made out of solid wood to make the drawer last for a long time, and make it slide smoothly. This type of drawer will provide the old-school feel and look for your specific project.
To summarize, drawer slides are an essential addition to the drawers. Several types are available, such as ball-bearing drawer slides, full-extension drawer slides, and wooden drawer slides. If you have trouble opening drawers that are heavily loaded with items, you will benefit from purchasing drawer slides that are able to carry the heavier weight of the stuff that is stored inside. These types of slides are typically made out of metal and are called heavy-duty drawer slides. Make sure that you get the slides with the soft close option as they work better and will last longer.
How to install drawer slides?
A drawer box is a rectangular box that is used for storing dishes, utensils, accessories, and other household items. Most drawer boxes have slide clips attached to the bottom for securing the drawer glide in place. Once you have the slides attached to the box, by drilling and screwing the glide in place based on the measurements provided in the glide manual, the drawer box can be pushed in place. Make sure you push the drawer box fully into the glide. The indicator that the drawer is secured properly with the glide is the click sound from the clip.
After installing the drawer in place, you need to adjust it to make sure it slides freely and the drawer fronts line up with the other doors of your cabinets. Most new drawer glides have lots of adjustments. The drawer can be adjusted left or right, up or down, in or out. All of these options do not require the use of the tools, so anyone can do it by following the instructions in the manual provided.
The next step in how to install a drawer slide is figuring out the correct drawer placement inside the cabinet. Depending on the drawer height that you would like to use, you need to plan where to drill holes for the glide inside the cabinet. Please note that if you are using under-mount glide, the drawer sides are placed ¼” above the bottom of the drawer glide.
The drawer boxes come in different depths depending on the depth available inside the cabinet box, so based on these depths you need to plan to buy the drawer glides. The most commonly used drawer glides have the following depths:
- 450 mm or 17 ¾ in
- 500 mm or 19 ⅝ in
- 550 mm or 21 ⅝ in
If you are dealing with drawers that are already in your cabinetry, then it is a simple matter of installing the new drawer slides. If you have existing cabinets that have drawer slides, then you can install new ones in order to create a more efficient workspace and fix all the issues that you might have with the old glides. Most of the time new glides will have the same drillings as the old ones if you are going with the same brand or type of glides. For example, to install the bottom mount drawer slides you will not need to drill new holes as most of them always have the same drilling patterns.
Drawers for heavy items can have heavier types of drawer slides. They work well with solid wood, plywood, or melamine drawers.
Conclusion
If you are in the process of making a decision about how to build your custom cabinetry, the Cut2Size team reminds you that one of the important factors is to keep in mind the construction. While it may be tempting to cut corners on the price of materials and hardware, you'll probably end up spending more time improving your cabinets afterwards. Make sure you build solid, strong cabinets and use heavy-duty, soft-close, metal drawer slides that come with a lifetime warranty. Also, make sure you have a good warranty on your doors and drawers and hardware. This will help you to enjoy your new cabinets.