Glazed Kitchen Cabinets - The Ultimate Guide
Not everyone strives for modern styles, follows trends and dreams of a brand-new cabinet look for their kitchen. Some homeowners put their heart and soul into scouring flea markets and garage sales for antique cabinets. You may create a pretty decent vintage kitchen style with old cabinets by refinishing them. It will hardly save your budget, since the refinishing process can take a lot of effort but you’ll get a truly unique kitchen design.
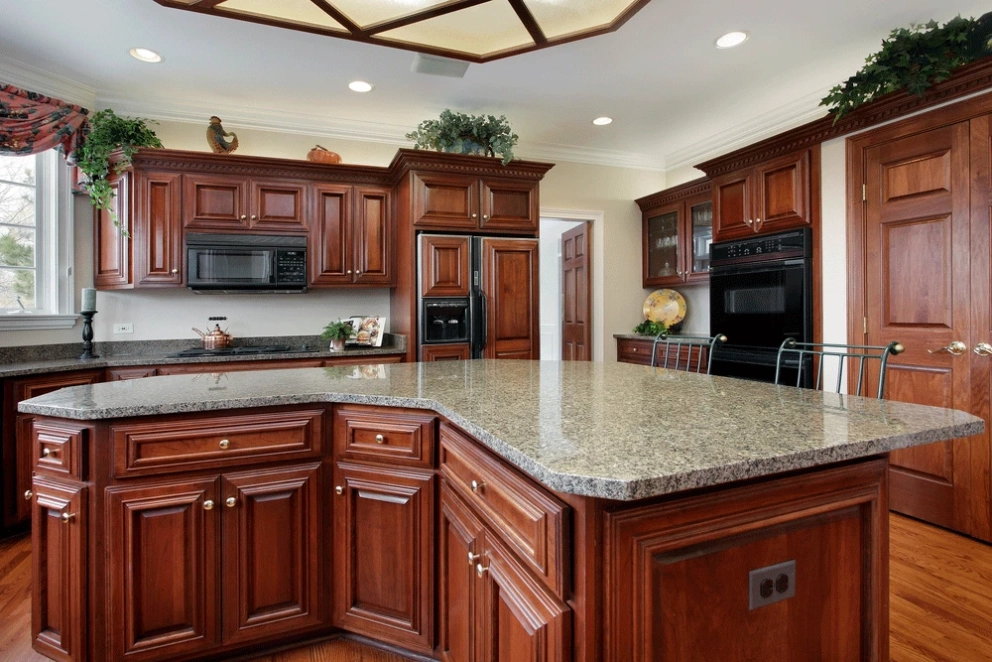
If you're a fan of beaded details on doors, millwork trimming, or raized panel cabinets and want to restore them for your kitchen, cabinet glazing is the best thing you can do to protect them from the environment and time. A glaze finish is used to highlight architectural details, such as groves or moulding. These details on cabinets are usually deepening in colour.
Whether you want your cupboards stationed or painted, a glaze top coat gives them a heritage look and additional humid and heat protection. You may find a comprehensive guide on the glazing cabinet process, and its pros and cons in the Cut2Size blog; here we share our tips on DIY refinishing your cupboards with glaze.
What are glazed cabinets?
Glazed cabinets are cabinets with a transparent or semi-transparent coating that is applied after the cabinet is painted and stained. Glazed kitchen cabinets have a more detailed appearance since the glaze is meant to highlight the meticulous groves and lines of the cabinet design to showcase its craftsmanship. If you’ve seen pictures of glazed cabinets, the glazing is noticeable in cabinet corners and vintage kitchen cabinetry designs. Glazing cabinets are usually done to revive old cabinetries and make them shine and look as good as new.
What is cabinet glazing?
Glazing kitchen cabinets refers to the process of applying a thin glaze over the cabinet after it is stained, painted, and cured. Glazing cabinet doors help bring out the unique architectural details of the cabinet and are considered a cost-effective way of revamping old cabinetry especially if you’re planning to remodel your kitchen but quite tight on budget.
Oil-based and water-based glazes are two kinds of glazes for kitchen cabinets you can choose from. A water-based glaze is best for glazing painted cabinets, and an oil-based glaze is best for glazing stained cabinets. Oil-based glazes take longer to dry, making them simpler to work with.
If your cabinets have been newly primed or stained and have had plenty of time to dry, glazing finished cabinets are the finest option. Oil-based paints, particularly those with an eggshell or glossy finish, perform well with glazing. On the one hand, it will be much trickier to handle with chalk paint that has not been sealed.
Is cabinet glazing right for your kitchen?
While painting cabinets with glaze is a great way to add visual character and detail to your kitchen, it is not for everyone. Glazing works best for kitchens with a traditional style. If you want to achieve the French provincial, farmhouse, or classic kitchen look, glazing might be an option. You can glaze your cabinets if you want to restore the antique cabinetry that you have or if you want to create a new look without buying a new one. Keep in mind that is not for kitchens with contemporary modern styles such as Scandinavian, minimalistic, and post-modern.
How to glaze kitchen cabinets?

Glazing a cabinet is as simple as painting a semi-transparent glaze coat above a cabinet door that has already been coated with regular matte paint. Glazing is applied into the cabinet to soak into the wood carvings and create a particular gloss that highlights the wood's features. Planning to glaze your kitchen cabinets by yourself? Here’s a detailed step-by-step guide.
Before anything else, get these tools and materials ready.
| Tools and Materials | ||
| Oil-based glaze | Paint stirrer | Degreasing cleanser |
| Oil-based paint | Sponge | 5-gallon bucket |
| Latex paint | Deglosser | 220-grit sandpaper |
| Foam brush | Screwdriver | Drop cloth |
| Natural bristle paintbrush | Painter’s tape | Paint thinner |
A step-by-step guide on how to glaze kitchen cabinets
- Unscrew the hinges on all cupboard doors and drawers, then dump the contents thoroughly. To prevent paint spatter, remove any fasteners, knobs, and handles. Use drop cloths and painter's tape to cover the surrounding surroundings, such as the carpet, floor, backsplash, and worktops.
- To eliminate any residue leftover from dinner prep, wipe your kitchen cabinets using a degreasing solution. Then use a towel to wipe away any remaining debris using a deglosser. If you're going to paint or stain the cabinet doors, use 220-grit sandpaper to polish the surface so the paint can be applied evenly.
- To get the proper base layer for the glaze, paint or stain the kitchen cabinets before glazing. Always use oil-based paint and keep your intended aesthetic in mind when selecting a hue. If you want a light-coloured glazed finish, for example, use oil-based paint in a cream-white tint. Dry the cabinet doors for at least 24 hours after painting or staining them.
- If you’re wondering what kind of glaze to use on kitchen cabinets, well, there are two types of glaze: oil-based and water-based. Oil-based glazes work best on stained cabinets, whereas water-based glazes work best on painted cabinets. Oil-based glazes dry more slowly than water-based glazes, making them simpler to work with. Choose pre-mixed glaze for the quickest application and prepare it by simply stirring it one more with a paint whisk after opening. You may build your own glaze by blending a store-bought glazing agent with latex paint to get a more customized tint.
- In the glaze, dip a cloth, a natural fibre paintbrush, or a foam brush. Then, add a thin glaze on each of the cabinets in a circular or linear motion. The glaze should seem sloppy and darker than what you have expected.
- Wipe the cabinet down with a clean cloth in a circular motion to remove any residual glazing. When cleaning away the glaze, you'll observe that it sticks to the cabinet's edges and exterior details, darkening them and enhancing the antiquated appearance. Continue spreading the glaze with the cloth until you're pleased with the overall result.
- Apply an extra coat of kitchen cabinets glaze to any crevices or carved inset moldings around the drawers, doors, or cabinet frame for a more textured finish. Wipe the glaze away but leave it a shade darker than the majority of the cabinet panel.
- Leave enough time for the glaze to cure. The minimum drying period is usually 24 hours; however, the pace of drying will vary depending on the environment and humidity. Although homeowners aren't required to apply a sealant to newly glazed cabinets, a layer of varnish, urethane, or lacquer finish either gloss or matte can protect the glazing and extend its life.
- After glazing wood cabinets remove any scattered paint or glaze with a cloth on cabinet surfaces using a paint thinner or boiled water. Before replacing the hardware, be careful not to wipe the freshly glazed cabinets and to allow them to dry completely. Glazing cabinets before and after the process require you to clean the surface with a rag or clean cloth. That's it! You're all done.

The process of glazing kitchen cabinets before and after is quite challenging but before you gather the materials and start the process, determine first what glazed kitchen cabinet colours to use. Here are different types of good paint & glaze colours for cabinets.
Glaze colours for kitchen cabinets
One of the challenges that homeowners encounter when glazing their kitchen cabinets is deciding on what kitchen cabinet glaze colours to use to glaze their kitchens. If you have noticed, glazed cabinets before and after show a significant difference when a certain glazed colour is applied. This is why selecting the appropriate colour is just as important as selecting the right type of glaze to use. Below is a list of the most common colours seen on cabinets.
- Burnt Umber. Umber is an iron oxide and manganese oxide-based natural brown colour. Umber is darker than ochre and sienna, which are comparable earth colours. Raw umber is the name given to it in its natural state. The hue intensifies when heated, and the result is called burnt umber.
- Smokey Gray. Gray paint has evolved from being cold and uninviting to being warm and inviting. Gray wall paints with a yellow or beige tone have a pleasant, peaceful, and neutral appearance. Painting your white cabinets with gray glaze gives you the freedom to experiment with various hues. Look at images of white kitchens with gray glazed cabinets before and after and you will see a huge difference as the cabinets visually stand out in the scene with the gray glazed.
- Bronze. The colour bronze is popular in kitchen cabinet hardware such as knobs, locks, and keyholes. Bronze brings out the antiquity of the cabinetry. Quite similar, a bronze-coloured glaze makes the wood shinier and smoother. If you want to maintain the natural wooden texture of your cabinetry, a bronze-coloured glaze is the perfect colour choice.
- Coffee. The coffee colour is basically a darker shade of brown. Darker glazed works for cabinets that are painted in dark colors. Dark cabinets, especially when contrasted with white walls and flooring, may help to warm up a space. Food and scrapes are more difficult to see on them. Darker cabinets may be an excellent choice if you have an active lifestyle with children or dogs since they are more durable and stronger than pale-coloured cabinets.
- Caramel. If you’re wondering what colour glaze for white cabinets is best, the answer is white over white or lighter colours such as caramel over a white cabinet surface. White glazed cabinets before and after applying darker colours such as brown to highlight the borders and crevices of your cabinet corners and drawers, white is considered safer to use especially if your goal is not really about enhancing the vintage or farmhouse vibe of your cabinetry but making it look more modern.